

Styrofoam
DVDs
DVD players (2)
Tripod
Printed poster
Masking tape
Joint rods (4)
External speakers (optional)
The making of

Traditional posters can sometimes overwhelm an audience with excessive text. In the typical scenario, the author stands next to the poster and walks you through the key figures. With this approach you can end up ignoring the text altogether. Or you may actually read the text and five poster presentations later you want to call it a day. Sound familiar?
The best way to describe how to do an interactive exhibit is to do a demo in person. An efficient alternative is to loop a demo video on the poster itself. Thus, the video-embedded poster is our solution.
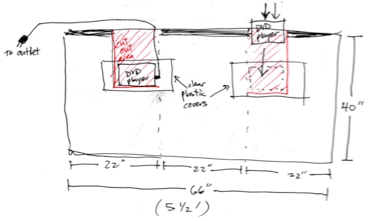
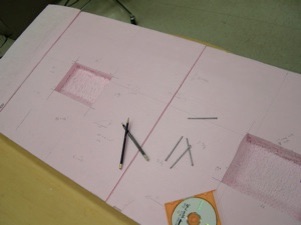
Front: three rectangular styrofoam boards are connected together to support two DVD players. The red area in the diagram above is cut out to make slots for the DVD players.
Monitor
Ideally, we’d attach a razor-thin LCD monitor behind the cutout poster so that the entire thing is thin and lightweight. However, we had several problems with this idea. Most LCD monitors are enclosed in a bulky case, require cables for video and power, and require a computer that drives the monitor and stores and plays video/audio. Most thin LCD monitors are expensive, too. Is there an affordable device that is thin, lightweight, self-powered and loaded with video and audio? Oh, yes, the Video iPod! Um, except its screen is too small... People usually stand a few feet away from the poster. The screen needs to be bigger.
Top: the edge is rounded to hide the styrofoam and to invite visitors from the side.
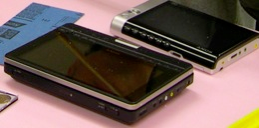
After several rounds of shopping, we settled on a DVD player that swivel 180˚ so that the monitor can be folded and be faced up. The screen size is 10 inch diagonal and displays at standard 4:3 or wide screen 16:9 format. We also got a slightly smaller 7 inch model. Both models came with remote controller; useful for skipping video clips without disassembling the poster. Each player costs less than the Video iPod.
Sony DVD players. Both models came with a remote controller; useful for skipping video clips without needing to take the poster apart.
Backing material
DVD players cleared all of our requirements, except their size and weight suggested that we would need a backing material to mount the devices.
We purchased a large board of styrofoam. Styrofoam is lightweight and is pretty easy to mold. At this point, it was clear that our poster wouldn’t be light and thin enough to be pinned onto a wall. So we put it up on a tripod. Still, we tried to keep the entire assembly light for easy transportation.
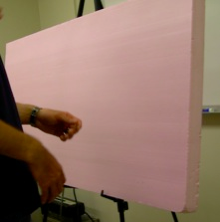
Styrofoam is light and easy to mold.

The poster is too heavy to be pinned to a wall, but it’s light enough to be supported by a single tripod.
The original dimension called for 66 inch by 40 inch. However, we intended to eliminate much of the text, and so we could reduce the overall size. We shrunk the height by almost half, now at 68 inch by 24 inch. The 68” width allowed a good separation between two DVD players.
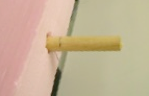
Still, the board was quite oversized to be carried onto an airplane. So we cut it into three pieces, with two joint rods on each side to connect them together.
Joint rods were inserted in the side of the board to connect sections of the styrofoam together.
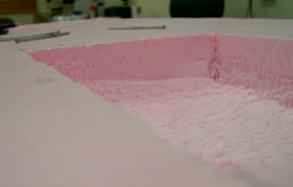
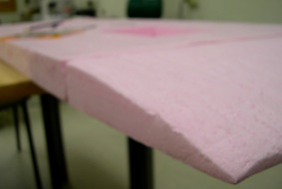
Two rectangular spaces were carved out of the face of the board using a chisel to create a pocket for each DVD player. Also, both end pieces of the board were sanded to make a round, aerodynamic look from the side.
The space for the DVD player is carefully carved out using a chisel.
The end of the board is rounded to hide the styrofoam and to invite visitors from the side.
Backing material is ready to go.
Filming
In collaboration with Dr. Eric Chudler and our colleagues, we filmed exhibit demos with middle school students. We rented two Canon GL2 digital video cameras from the University of Washington’s Student Technology Fee Equipment Loan Program.
Post production
Video editing was done using Apple iMovie HD on two MacBook Pros.
DVDs
The final version was burned on DVDs using Apple iDVD 6.
Printed poster
The poster was designed on Apple Pages 2. We made a video and a paper version. The paper version was a back up. We never used the back up poster, but it didn’t hurt to have one ready.
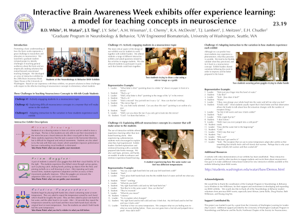
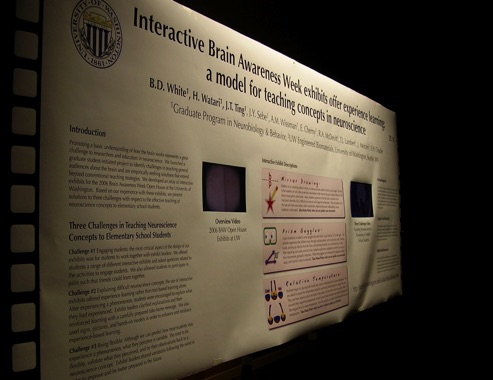
We designed a video version (above) and a paper version (right). The paper version conforms to traditional poster format. The video version uses minimal text and its dimension is much shorter in height. The white area below the monitor is not a “dead space”; it’s designed to direct attention to the video. Its unique, wide form factor allows enough separation between the two monitors.

The poster marked its debut at the Graduate Program in Neurobiology & Behavior retreat on September 18, 2006. An improved version was presented at the SfN Annual Meeting on October 15, 2006.
The video demos are freely available for viewing or download at our BAW website.
Comments? Contact the Outreach Team.
This project between the three of us (shown above) was one of the first major activities of our Outreach Team, which has now developed into a registered student organization called Neurobiology & Behavior Community Outreach at the University of Washington, Seattle.


Hiro Watari
Bryan White
Jonathan Ting
Authors
Bryan White, Hirofumi Watari, Jonathan Ting, Joy Sebe, Anne Marie Wissman, Elena Cherny, Ross McDevitt, Talley Lambert, John Meitzen and Eric Chudler
Special thanks to
Janet Altman, Jamie Bullis, Doug Wacker, Beth Wilkinson and Hsiang-Ling Yen
Support contributed by
Learning for Leadership Council, University of Washington
Graduate Program in Neurobiology & Behavior, University of Washington
Student Technology Fee, University of Washington
Pacific Cascade Chapter of the Society for Neuroscience


Supported by
Graduate Program in Neurobiology & Behavior

Contact the